Tuesday, May 12, 2009

Web Service Example

This example is use ASP.NET to create a simple Web Service that converts the temperature from Fahrenheit to Celsius, and vice versa:

<%@ WebService Language="VBScript" Class="TempConvert" %>

Imports System
Imports System.Web.Services

Public Class TempConvert :Inherits WebService

Public Function FahrenheitToCelsius
(ByVal Fahrenheit As String) As String
dim fahr
fahr=trim(replace(Fahrenheit,",","."))
if fahr="" or IsNumeric(fahr)=false then return "Error"
return ((((fahr) - 32) / 9) * 5)
end function

Public Function CelsiusToFahrenheit
(ByVal Celsius As String) As String
dim cel
cel=trim(replace(Celsius,",","."))
if cel="" or IsNumeric(cel)=false then return "Error"
return ((((cel) * 9) / 5) + 32)
end function

end class

This document is saved as an .asmx file. This is the ASP.NET file extension for XML Web Services.

Explained about example

The first line in the example states that this is a Web Service, written in VBScript, and has the class name "TempConvert":

<%@ WebService Language="VBScript" Class="TempConvert" %>

The next lines import the namespace "System.Web.Services" from the .NET framework:

Imports System
Imports System.Web.Services

The next line defines that the "TempConvert" class is a WebService class type:

Public Class TempConvert :Inherits WebService

The next steps are basic VB programming. This application has two functions. One to convert from Fahrenheit to Celsius, and one to convert from Celsius to Fahrenheit. The only difference from a normal application is that this function is defined as a "WebMethod()".

Use "WebMethod()" to convert the functions in your application into web services:

Public Function FahrenheitToCelsius
(ByVal Fahrenheit As String) As String
dim fahr
fahr=trim(replace(Fahrenheit,",","."))
if fahr="" or IsNumeric(fahr)=false then return "Error"
return ((((fahr) - 32) / 9) * 5)
end function

Public Function CelsiusToFahrenheit
(ByVal Celsius As String) As String
dim cel
cel=trim(replace(Celsius,",","."))
if cel="" or IsNumeric(cel)=false then return "Error"
return ((((cel) * 9) / 5) + 32)
end function

Then, end the class:

end class

**Publish the .asmx file on a server with .NET support, and you will have your first working Web Service.

Learn more How To Use Web Service at http://www.w3schools.com/webservices/ws_use.asp


Learn SOAP Now!

Before study SOAP, I should have a basic understanding of XML and XML Namespaces.

I need to study these subjects first from XML Tutorial.


What is SOAP?

  • SOAP stands for Simple Object Access Protocol
  • SOAP is a communication protocol
  • SOAP is for communication between applications
  • SOAP is a format for sending messages
  • SOAP communicates via Internet
  • SOAP is platform independent
  • SOAP is language independent
  • SOAP is based on XML
  • SOAP is simple and extensible
  • SOAP allows you to get around firewalls
  • SOAP is a W3C recommendation

Why SOAP?

Today's applications communicate using Remote Procedure Calls (RPC) between objects like DCOM and CORBA, but HTTP was not designed for this. RPC represents a compatibility and security problem; firewalls and proxy servers will normally block this kind of traffic.

A better way to communicate between applications is over HTTP, because HTTP is supported by all Internet browsers and servers. SOAP was created to accomplish this.

SOAP provides a way to communicate between applications running on different operating systems, with different technologies and programming languages.


Read more from http://www.w3schools.com

Web Service

What are Web Services?

  • Web services are application components
  • Web services communicate using open protocols
  • Web services are self-contained and self-describing
  • Web services can be discovered using UDDI
  • Web services can be used by other applications
  • XML is the basis for Web services

How Does it Work?

The basic Web services platform is XML + HTTP.

XML provides a language which can be used between different platforms and programming languages and still express complex messages and functions.

The HTTP protocol is the most used Internet protocol.

Web services platform elements:

  • SOAP (Simple Object Access Protocol)
  • UDDI (Universal Description, Discovery and Integration)
  • WSDL (Web Services Description Language)

Web Services take Web-applications to the Next Level

By using Web services, your application can publish its function or message to the rest of the world.

Web services use XML to code and to decode data, and SOAP to transport it (using open protocols).


Two Types of Uses

Reusable application-components.

There are things applications need very often. So why make these over and over again?

Web services can offer application-components like: currency conversion, weather reports, or even language translation as services.

Connect existing software.

Web services can help to solve the interoperability problem by giving different applications a way to link their data.

With Web services you can exchange data between different applications and different platforms.

Learn more Web Service tutorial from http://www.w3schools.com/default.asp

Sunday, May 10, 2009

MS Word: Where to edit cut,copy and paste option

This case only for MS Word 2007

  1. Go to Office button
  2. Click on Word Option


  3. Click Advanced
  4. Go to cut, copy and paste section..
  5. Setting what you want
  6. Click Ok. Done.
***If the setting is not working, try to restart your pc first, then try copy and paste.
It should be ok.

How to setup Drupal site in localhost?

Creating a test site on a local computer

It is considered a good practice to do all development work on a separate test site before making changes to a production site. A test site allows you to evaluate the impact of upgrades, new modules, modifications to themes etc. without causing disruption to your live site. For information about setting up a web server on a local computer, see the Local Server Setup section of the Developing for Drupal guide.

  1. Download Drupal.

    Drupal files, and associated modules, are compressed in the .tar.gz format and can be extracted using most compression tools.

    On a typical Unix command line, use:
    wget http://drupal.org/files/projects/drupal-x.x.tar.gz
    tar -zxvpf drupal-x.x.tar.gz

    This will create a new directory drupal-x.x/ containing all Drupal files and directories and will preserve all of Drupal's file and directory permissions. Move the contents of that directory into a directory within your web server's document root or your public HTML directory.

    mv drupal-x.x/* drupal-x.x/.htaccess /var/www/html

    The base URL for your Drupal installation will be set in your Web server's configuration file. You will need to know this URL before proceeding to the next step of the installation. If you are installing Drupal on your local machine the base URL may be: http://localhost. If you are installing Drupal onto a Web server your base URL may be a specific domain name (such as http://example.com).

    Note for Windows users
    A number of compression programs, such as 7-Zip, allow you to extract .tar.gz files. To use 7-Zip, right-click on the .tar.gz file and, in the menu that appears, select 7-Zip -> Extract Here. A .tar file will appear. Right-click on the .tar file and again select 7-Zip -> Extract Here. In a few moments, the final Drupal folder will appear.

  2. Grant write permissions on the configuration file

    Your Drupal download comes with a default configuration file at drupal/sites/default/default.settings.php which needs to be prepared so that the installer can edit it.

    • Copy the default.settings.php to settings.php. You can do this from the command line using cp default.settings.php settings.php.
      NOTE: Do not simply rename the file. The Drupal installer will need both files.
    • You should now have both a default.settings.php and settings.php file in your drupal/sites/default directory.
    • Make the settings file writeable, so that the installer can edit it
      chmod a+w sites/default/settings.php
      or
      chmod 666 sites/default/settings.php
      Both commands have the same effect.
      Several FTP tools like Filezilla, Transmit, and Fetch allow you to change file permissions, using a 'file attribute' or 'get info' command. In this case the octal or numeric value file permission should be set to 666.
    • Drupal should set the file permissions back to read-only once the installation is done. You should make sure this is the case and manually change it yourself if it didn't happen. You can use the same command, slightly modified, to remove write permission:
      chmod a-w sites/default/settings.php
      or
      chmod 555 sites/default/settings.php.
      If you are using a FTP tool the permission should be set to 555.
  • Windows note
    On a Windows system this would be Change permission and make sure the file is not marked Read Only before running the installer and then set it back to Read Only after. For more information about modifying Windows file permissions, see the Troubleshooting FAQ

  • Create database

    • Create database with MySQL

      This step is only necessary if you don't already have a database set-up
      (e.g. By your host). In the following examples, 'username' is an example MySQL user which has the CREATE and GRANT privileges. Use the appropriate user name for your system.

      First, you must create a new database for your Drupal site here, 'databasename' is the name of the new database):

      mysqladmin -u username -p create databasename

      Next you must login and set the access database rights:

      mysql -u username -p

      You will be asked for the 'username' database password. At the MySQL prompt, enter following command:

      GRANT SELECT, INSERT, UPDATE, DELETE, CREATE, DROP, INDEX, ALTER ON databasename.* TO 'username'@'localhost' IDENTIFIED BY 'password';

      where

      'databasename' is the name of your database
      'username@localhost' is the username of your MySQL account
      'password' is the password required for that username
    • FLUSH PRIVILEGES;

      the database should be created with UTF-8 (Unicode) encoding

  • Run The Installation Script
    • To run the install script point your browser to the base URL of your website.

      The base URL is defined in your Web server configuration file and is specific to the document root where you placed your Drupal files. If you have installed Drupal on your desktop machine this URL might be http://localhost.

      You will be guided through several screens to set up the database, create tables,

      add the first user account and provide basic web site settings.


Drupal Installation: System Requirements

System Requirements

Webserver
Apache (Recommended)

  • Drupal will work on Apache 1.3 or Apache 2.x hosted on UNIX/Linux, OS X, or Windows. The majority of Drupal development and deployment is done on Apache so there is more community experience and testing performed.
  • You can use the Apache 'mod_rewrite' extension to allow for clean URLs.

PHP

Recommended: PHP 5.2 or higher
Required: PHP version 4.3.5 or higher

  • PHP 5.2 or higher will be a requirement for Drupal 7.
  • PHP memory requirements can vary significantly depending on your use of modules. While 16 MB may be sufficient for a default Drupal 6 installation, a production site with a number of commonly used modules enabled (CCK, Views etc.) could require 64 MB and some installations may require much more, especially with media-rich implementations. If you are using a hosting service it is important to verify that your host can provide sufficient memory for the set of modules you are deploying or may deploy in the future. (See the Increase PHP memory limit page in the Troubleshooting FAQ for additional information on modifying the PHP memory limit.)
  • The PHP extension for connecting to your chosen database must be installed and enabled. Drupal's currently supported database connectors are: mysql (the original MySQL extension), mysqli (an improved connector for newer MySQL installations), and pgsql (for PostgreSQL). Note: PHP 5.x no longer enables the mysql extension by default. Please read the links above for installing and enabling your chosen connector. Additionally, Drupal 6.x does not provide the option to select the mysql connector if mysqli is enabled in your PHP configuration.
  • PHP XML extension (for blogapi, drupal, and ping modules). This extension is enabled by default in a standard PHP installation; the Windows version of PHP has built-in support for this extension.
  • An image library for PHP such as the GD library is needed for image manipulation (resizing user pictures, image and imagecache modules). GD is included with PHP 4.3 and higher and enabled by default. ImageMagick is also supported for basic image manipulations in Drupal core but there is much less support from contribute modules.
  • PHP needs the following configuration directives for Drupal to work (only directives that differ from the default php.ini-dist / php.ini-recommended):
    • register_globals: off; this is the default value, but some hosts have it enabled
    • session.save_handler: user
    • error_reporting set to E_ALL & ~E_NOTICE. Work is ongoing to change this to E_ALL for Drupal 6.
    • safe_mode: off. Safe mode may interfere with file and image uploads.
    • In addition, we recommend the following setting: session.cache_limiter: nocache
  • Some of these settings are contained in the default .htaccess file that ships with Drupal, so you shouldn't need to set them explicitly. Note, however, that setting PHP configuration options from .htaccess only works under the following conditions:
    • With Apache (or a compatible web server)
    • If the .htaccess file is actually read, i.e. AllowOverride is not None
    • If PHP is installed as an Apache module
  • See the PHP manual for how to change configuration settings for other interfaces to PHP.
  • In some shared hosting environments, access to these settings is restricted. If you cannot make these changes yourself, please ask your hosting provider to adjust them for you.

Database

Recommended: MySQL 4.1 or MySQL 5.0

  • Drupal 6 supports MySQL 4.1 or higher.
  • Drupal 5.x and earlier supports MySQL 3.23.17 or higher. MySQL 4.1 or higher is strongly recommended.
  • Drupal 7 will only support MySQL 5.0 or higher.
  • NOTE: Drupal makes use of some features not available on some inexpensive hosting plans so please check that your host allows database accounts with the following rights:
    SELECT, INSERT, UPDATE, DELETE, CREATE, DROP, INDEX, ALTER.
    These rights are sufficient to run Drupal core 6.x.

    Some contributed modules, and also Drupal core 5.x, additionally require the following rights:
    CREATE TEMPORARY TABLES, LOCK TABLES.

  • Note: If your system/host is running MySQL 4.1 or newer and you receive the error "Client does not support authentication protocol requested by server", address the problem by following the instructions provided by MySQL AB. There is a minor OS issue with some MySQL 5+ installations primarily on Windows but affecting some versions of Unix/Linux as well.
  • Note:When using Drupal 5.x or later, particularly with contributed modules, it may be necessary to set the system variable max_allowed_packet to at least 16M. Some inexpensive hosting plans set this value too low (the MySQL default is only 1M). In that case, you may need to choose a better hosting plan. A value of 1M may be sufficient for 5.x.

Thursday, May 7, 2009

Drupal: Issue: Redirect page in Drupal

In my case I need to redirect from default main page to cas authentication page outsite server.

  1. Go to Home> Administer> User Management> Cas Setting

  2. Go to Redirection Setting

  3. Edit at

    Enter one page per line as Drupal paths. The '*' character is a wildcard. Example paths are 'blog' for the blog page and 'blog/*' for every personal blog. '' is the front page.

    The message displayed to a user when he successfully logs in via CAS. You may specify '%cas_username', the username of the user.
    Activate this option if you want a user to be directed to the following page after logging out of CAS. The logout destination must be specified below.
    URL. An example URL is 'http://www.example.com'.

  4. ** In the website, remain link to the default portal url .

  5. Refresh and test the changes. The link to the portal will redirect to cas login page.

  6. Done.


Drupal: How to upload/ change admin/user gravatar icon

  1. First you must prepare your new gravatar icon.
    (48x48 pixel and the maximum size is 30 kB)

  2. Go to Home> Administer> User Management > Users

  3. Find user that you want to edit. Click Edit.

  4. Delete current picture & Upload new picture.

  5. Save changes.

  6. Refresh the page and see the changes.

Drupal 6.x: Where To Edit Title Text Size/Style In Posting Pages

In my case, I use FreeBSD Server... so here the way to go

  1. Log into freeBSD server/ web server.(use root password)

  2. Go to :
    # cd /usr/local/www/apache22/data/sites/all/
    themes/theme_name
    # ee style.css

  3. Search h2 in the style.css file
    • Click ctrl +y
      Search for: h2
    • Edit font size or other style
    • Press esc + enter 2X - Save setting

  4. Refresh page in browser & see the changes.

Wednesday, May 6, 2009

phpCAS


What is phpCAS?
phpCAS is a library which allows clients written in PHP to
authenticate to a CAS (Central Authentication Service) server.

* Package name    : libcas-php (not sure, needs policy)
Upstream Author : Pascal Aubry
* URL : http://www.ja-sig.org/wiki/display/CASC/phpCAS
* License : BSD
Programming Lang: PHP
Description : CAS client library for PHP

User documentation

Related link:
Applications CASified with phpCAS
Developing phpCAS
phpCAS acknowledgements
phpCAS bug reports
phpCAS ChangeLog
phpCAS examples
phpCAS i18n
phpCAS installation guide
phpCAS Issues
phpCAS logout
phpCAS mailing lists
phpCAS requirements
phpCAS source documentation
phpCAS troubleshooting

Drupal 6.x: How to hide submitted by and date in posting page/story

  1. Make sure the sites folder are in writable mode.(In my case I use FreeBSD server).
    If not, firstly I must edit chmod permission to 775 at least.. or 777 for a while.
    (**Make sure after finish, change back to normal mode:755)

  2. Go to admin page Home > Administer > Site building> Themes

  3. Click on Configure or Global Setting

  4. Go to this section:

    Display post information on
    Enable or disable the submitted by Username on date text when displaying posts of the following type.
  5. Uncheck page box or any box which you done want the submitted by and date to be displayed.

  6. Save Configuration.

  7. Refresh the page and see the submitted by and date are not displayed anymore.

  8. **Make sure after finish, change back the sites folder to normal mode:755

  9. All done.


Tuesday, May 5, 2009

Drupal: Installing a Custom Drupal Theme

You can:
1. Download a free custom theme from Drupal.org
2. Buy a custom theme on the internet from a site such as Template Monster
3. Hire a designer to create one for you
4. Design your own

Step 1: Download the Custom Theme

For this example we are going to pick a free theme from Drupal.org. Once you are on Drupal.org, click Themes – located in the top right column.


Drupal Theme Link

If you installed under the 6.x version, so click on 6.x to filter out other versions.

Theme 6x

You have checked out all the themes, navigated to the demo pages, and found a theme to download – click “Download” making sure that you've clicked the corresponding version.


Download Zen

Step 2: Uploading Files to the Server

1. Open root path in www(webserver)
2. Go to theme folder.... root path/sites/all/themes/

Drupal: Manually Installing Drupal

Step 1: Setting up your Database

Log into the cPanel (control panel) of your hosting account. Once you are logged in you will want to find the MySQL link.

The one for Bluehost looks like this:

mysql

Next, you will be prompted to give your database a name - for this example I picked "testsite".

create database

Now, you must create a user and password for the database - for this example I picked "test" as my username.

new user

After you are done adding a new user, you will have to assign the new user to the database that you just created. In Bluehost the assignment box is just below the "Add User" box.

(The only reason you are seeing "xseeddes_" is because that is the root name associated with my hosting account. You will have something different, it all depends on your host.)

assign user

The last step in setting up the database is assigning user privileges.
1. Make sure that you have the correct user and database.
2. Click the check all box - Drupal will need access to the database.
3. Click "Make Changes".

manage user privileges

Step 2: Download Drupal

Go to Drupal.org and click the Download tab.

Drupal

On the next page, click Drupal Project. Then click the download link for the corresponding version of Drupal you wish to download. (At the time of this writing Drupal 6.9 is the most current. Just make sure you do NOT download any version highlighted in red - that would be bad.)

download version

Step 3: Uploading Drupal to Your Site

The next phase of installing Drupal is moving it from your computer to your website's server. The first thing you will need to do is log back into your control panel and open your file manager.

Inside of the File Manager you need to do the following:
1. Click on your Public_html folder.
2. Ensure that you have clicked on the correct folder by viewing that path as shown below.
3. Click Upload.

public html folder

Once again, check the path to ensure that you are uploading to "Public_html" folder. Click the browse button to find the Drupal file located on your computer and upload.

upload

Now, it is time to extract the files from the zipped (compressed) Drupal file.
1. Check the Drupal file.
2. Click Extract.

extract files

Once the compressed file is unzipped, it will still be in a folder called Drupal-6.9. You will need to take all the contents out of that folder. To do so, open the Drupal folder.

Inside of the Drupal folder you will see several folders and files. Check all files and folders and click "Move Files"

Ensure that you are moving them into the Public_html folder.

move files

*NOTE: After moving the files and folders, make sure that you have successfully moved the .htaccess file as shown below.

files

Step 4: Configuring the settings.php file

Inside of the File Manager open the Public_html tree and navigate to the Default folder as shown below. Click to open the Default folder.

default folder

Inside of the Default folder there is a "default.settings.php" file. You will need to make a copy of that file and rename it settings.php - as shown below.

settings file

The next step in your journey - which is almost over by the way - is to open the "settings.php" file with your code editor. In Bluehost, you can open the file in code editor by right clicking on the file. (Each host is different but either way you need to be able to edit the code.)

Once inside the file, scroll down to line 92. Edit line 92 to reflect your database username, password, and databasename.
*NOTE: Leave the "@localhost" - Do NOT erase.

change info

In the beginning of this example, I set my database username to: xseeddes_test
I set my database name to: xseeddes_testsite
And lets say my password is 1234

A proper code edit of line 92 would look like the example below.

good

Now, save your changes to the settings.php file and get ready for the final step!

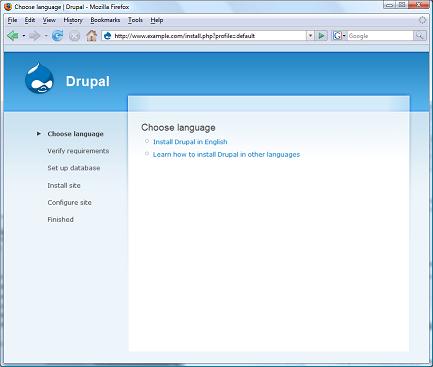
Step 5: Logging into your new Drupal Website

If you were successful in the first four steps, the picture below is what you should see in your web browser.

installed successfully

We are reading English right now, so I'm guessing that is what you are going to pick. But maybe not :)

After choosing your language you should see all green checks. If by chance you get a red box don't freak out - you missed one of the steps above. Most likely, you didn't give the web server enough permission to write or the settings.php file was not configured properly.

But a good install looks like the screenshot below. If you received all green checks, give yourself a big hug. Now, you can fill in your site information.

good install

Almost done, next up is your website username and password - this will be the top administrators name and password.

site username

Last but not least is the Time and Date setting - this should already be set to your local time. If your server is set up for Clean URL's you can enable them now. If not, it can be set up at a later time.

clean urls

Drum roll please.

welcome to drupal

Congrats! And Welcome to Drupal! If you made it this far you have just successfully finished your first Drupal installation.

Thanks again agoodi!


Drupal: Configuring Your Drupal Theme

Changing Basic Theme Settings:

Let's go to the Theme Configuration page.

1. Click Administer
2. Click Site Building
3. Click on Themes

select themes

By default, the Garland theme is enabled and set to default in Drupal. For this example we are going to leave it set at Garland.

Enabling more than one theme allows users (if you have multiple site members) to select there own theme settings.

NOTE: If you are going to be using a custom theme or want control of how your content is displayed, it is best to leave one theme enabled and set to default.

The picture below is what you should have selected for this example. Next, click on the "configure" link.

configure theme

Changing Colors:

The first thing we are going to do is change the base color.

Ensure that base is selected as shown below.

select base color

The base color is your website's background color. The numbers and letters you see next to the # sign are all apart of the hexadecimal numeral system. It is what browsers use to interpret the color output.

Enter #000000 into the base color field (those are zeros not O's by the way.) and then click save configuration.

The picture below highlights the change in the background color. Although, the hexadecimal code #000000 is black, Drupal does not output the color black because of CSS styling. The color is set to fade from top to bottom. We will get more into custom theme design later.

background color

Next, you should play with the color wheel on the right. The outer wheel will allow you to select a color range, while the block in the middle will let you pick your saturation and value.

Experiment with it as I did in the example below. Remember, your site is off-line.

changed theme

Display Settings:

Next, we are going to cover display settings. On the bottom of the current page, there are two sections, let's edit the "Toggle Display" and "Logo image settings" sections.

Uncheck Logo, Site Name, Mission Statement, and Shortcut Icon, as shown below. Click save configuration.

unchecked items

In the picture below, notice how the Drupal logo and the site name have disappeared. We have unchecked mission statement for processing reasons only, since we have no mission statement to post, there is no need to process it.

before and after

We also unchecked an item called, "Shortcut Icon". The shortcut icon refers to what is commonly called a favicon or the really tiny logo you see next to a website name in the address bar or on the window tab.

favicon before and after

If you have your own custom logo or favicon you can also upload it on this page as well. To upload your logo or favicon, use the browse button to search for the file on your computer, then click save configuration. Drupal will automatically define a path for your logo and check "logo" in toggle display.

printed logo

Now that you know what all this theme stuff does, enable some different themes and play around with the settings.

Thanks agoodi.